WorldWar-2.com

Operation Sunflower (Sonnenblume)

February 1941 - April 1941

‘The Germans have come to aid us, but Africa remains an Italian theatre of war. We shall restore the honour of our armies.’
Benito Mussolini - Prime Minister and Duce of Italy - 1st March 1941

Introduction to Operation Sunflower

Operation Sunflower (Sonnenblume) marks Germany's intervention in the North African Campaign following the destruction of the Italian 10th Army during Operation Compass. Facing the collapse of its Italian ally and the possible loss of Libya, Germany dispatches the Afrika Korps under the command of Generalleutnant Erwin Rommel to stabilise the front. What begins as a limited mission to support the Italian Army quickly develops into a bold offensive that transforms the course of the desert war.

Landing at Tripoli in February 1941, Rommel soon recognises that British forces are far weaker than German intelligence has estimated. Ignoring orders to remain on the defensive until the arrival of the 15th Panzer Division, he launches an offensive from El Agheila in late March. Working alongside Italian formations, the Axis advance rapidly across Cyrenaica, recapturing El Agheila, Mersa Brega, Benghazi, Mechili, Derna, and Bardia, forcing British and Commonwealth forces into a fighting retreat towards the Egyptian frontier.

The advance finally stalls at the fortified port of Tobruk, where the 9th Australian Division and supporting British troops establish a determined defence. Unable to seize the harbour by direct assault, Rommel is drawn into the opening stages of the Siege of Tobruk while simultaneously defending his exposed frontier against increasingly aggressive British raids. This timeline follows the arrival of the Afrika Korps, Rommel's first offensive across Cyrenaica, the retreat to Tobruk, and the opening weeks of one of the defining campaigns of the North African War.

February 1941

The Arrival of the Afrika Korps

6th February 1941

Generalmajor Erwin Rommel is appointed to command the German expeditionary force being sent to Libya as part of Operation Sunflower. The German commitment to North Africa was limited, officially framed as a stabilisation force intended to support Italian forces following their heavy defeat during Operation Compass. Rommel’s command was to include the 5th Light (Leichte) Division and the 15th Panzer Division and would technically fall under the Italian High Command (Comando Supremo).

12th February 1941

Generalmajor Erwin Rommel lands in Tripoli and reports to General Italo Gariboldi, Commander-in-Chief of Italian forces in Libya, whose command includes the infantry divisions Trento, Brescia, Pavia and Sabratha, together with the motorised Ariete Armoured Division, which is placed under Rommel's operational control. These divisions are currently concentrated around Tripoli in Tripolitania.

The strategic situation facing the Axis is precarious following the destruction of the Italian 10th Army during the British offensive, Operation Compass. Cyrenaica is now almost entirely in British hands and, although officially tasked with stabilising the front and preventing any further British advance into Tripolitania, Rommel begins to assess opportunities for offensive action.

14th February 1941

Ships carrying the advance elements of the 5th Light Division (Aufklärungs-Abteilung 3 and Panzerjäger-Abteilung 39) dock at Tripoli Harbour during the evening. Rommel, eager to get them moving as quickly as possible, orders the port to remain fully illuminated throughout the night so that the troops and their vehicles can be unloaded immediately.

Die Deutsche Wochenschau Newsreel of the Afrika Korps Advance Across Cyrenaica

Die Deutsche Wochenschau documents the advance of the German Afrika Korps across Cyrenaica during Operation Sunflower in 1941, including the recapture of several Libyan towns as Axis forces drive east towards the Egyptian frontier.
15th February 1941

By early morning, Aufklärungs-Abteilung 3 is unloaded and paraded through the streets of Tripoli, with Panzerjäger-Abteilung 39 joining it by mid-morning in an attempt to boost the morale of the local Italian population and impress the Italian command.

Following the parade, and with much of the 5th Light Division's armour, artillery and transport still at sea, both units are immediately pushed east along the Via Balbia toward Sirte with the task of establishing a forward screen and preparing defensive positions. This rapid deployment reflects Rommel's determination to seize the initiative before British forces can renew their offensive.

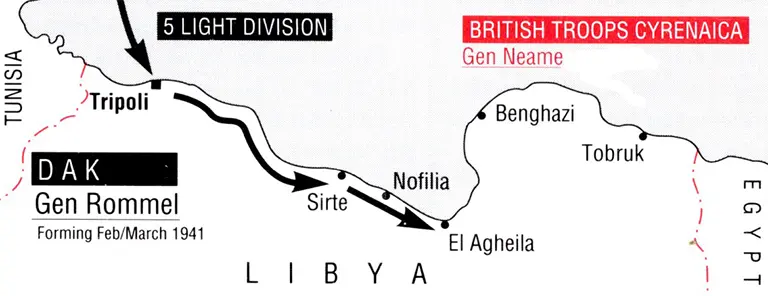
Operational map showing the arrival of the Afrika Korps and 5th Light Division at Tripoli and their advance toward El Agheila during Operation Sunflower, February–March 1941
Map illustrating the arrival of General Erwin Rommel’s Afrika Korps in Tripoli in February 1941 and the forward movement of the 5th Light Division along the Libyan coast toward El Agheila. The deployment marked the beginning of Germany’s intervention in North Africa under Operation Sunflower, setting the stage for the desert campaign against British forces in Cyrenaica.
19th February 1941

The German expeditionary force in North Africa is officially designated the Deutsches Afrika Korps (DAK) following the arrival of the first elements of the 5th Light Division in Libya.

24th February 1941

The first clash between British and German troops in North Africa occurs near Nofilia, a coastal village along the Via Balbia between Sirte and El Agheila. The skirmish involves the 1st Company of Aufklärungs-Abteilung 3 from the recently arrived German 5th Light Division clashing with armoured car patrols of the veteran British 11th Hussars, Cyrenaica Command. With German troops still adapting to desert warfare, the engagement serves as a probing action to assess the strength and disposition of British forces in the area, whilst confirming to the British that German troops have arrived at the front.

During the action, the Germans successfully ambush the British patrol, killing one soldier and capturing three others along with two British armoured cars.

24th February 1941

Lieutenant-General Sir Philip Neame officially takes over Cyrenaica Command headquartered in Barce from Lieutenant-General Sir Henry Maitland Wilson who was to take command of W Force and depart for Greece.

United Kingdom Flag

General Archibald Wavell

Commander-in-Chief Middle East

2nd March 1941

‘The arrival of German forces will stiffen the Italians, but the desert remains a battle of supply lines. Their numbers are still small; we must not exaggerate.’

March 1941

Operation Lustre and the Greek Diversion

4th March 1941

The first contingent bound for Greece begins departing Egypt as part of Operation Lustre. Commanded by Lieutenant-General Henry Maitland Wilson, "W Force" includes experienced formations drawn from General Archibald Wavell's already overextended Middle East Command, most notably the 6th Australian Division, 2nd New Zealand Division and the British 1st Tank Brigade, while the Polish Independent Carpathian Rifle Brigade is earmarked and prepared for imminent deployment.

This decision, strongly supported by Winston Churchill, significantly weakens British strength in Cyrenaica, leaving only the thinly spread, under-equipped British 2nd Armoured Division and the fresh but inexperienced 9th Australian Division to watch the frontier at the very moment German forces are arriving in Libya.

German Flag

Generalleutnant Erwin Rommel

Commander of the Deutsches Afrikakorps

Telegram from Rommel to the OKW on 6th March 1941

‘I shall attack, come what may.’
11th March 1941

With the 5th Light Division having now fully deployed in Tripolitania, Rommel directs it to begin preparations for an attack on the key British defensive position and staging area at El Agheila along the Via Balbia highway. Capturing El Agheila would be critical to securing Axis supply routes and enabling a further advance into Cyrenaica.

19th March 1941

Having flown to Germany the previous day, Rommel attends a conference at the Chancellery in Berlin with Adolf Hitler, Field Marshal Walther von Brauchitsch (Commander-in-Chief of the Army) and General Franz Halder (Chief of the General Staff). During the meeting, he is instructed to remain on the defensive until the arrival of the 15th Panzer Division, which is not expected to reach Libya until late May.

German planners remain concerned about the vulnerability of Axis supply lines and believe that the limited forces already in North Africa are insufficient for major offensive operations. Rommel outwardly accepts these instructions but leaves Berlin convinced that the British position in Cyrenaica is far weaker than German intelligence estimates.

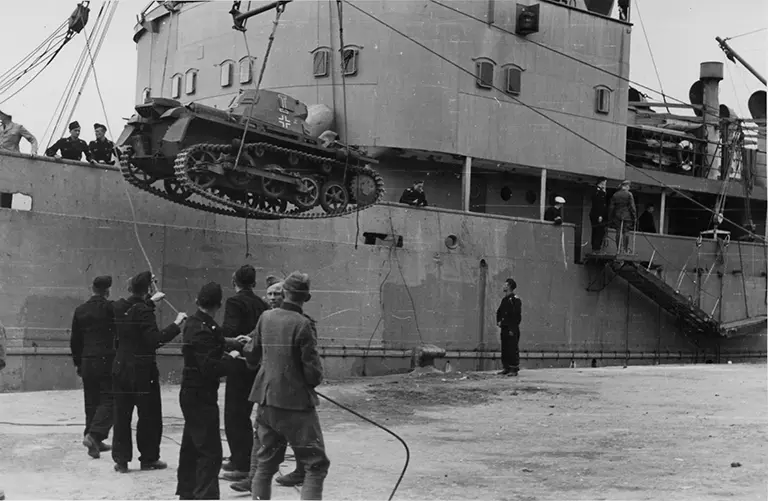
German Panzer I light tank being unloaded by crane from a transport ship at Tripoli harbour during Operation Sunflower, March 1941
A German Panzer I light tank of the 5th Light Division is unloaded by crane from a transport ship in the port of Tripoli in March 1941. The arrival of armoured units marked the operational beginning of Germany’s intervention in North Africa under Operation Sunflower, reinforcing Italian forces and preparing for the forthcoming advance into Cyrenaica.
21st March 1941

Arriving back in Libya, Rommel immediately demonstrates his aggressive leadership by disregarding orders from both Berlin and Rome to remain on the defensive. Confident that British forces in Cyrenaica are overstretched following the diversion of troops to Greece, he finalises his preparations to attack the British positions at El Agheila.

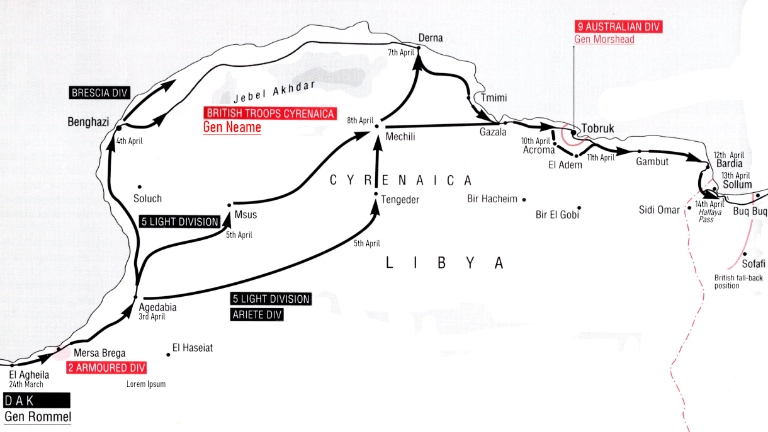
Operational map showing Rommel’s first offensive across Cyrenaica in March–April 1941, with Axis advances from El Agheila through Benghazi, Mechili, Derna and toward Tobruk
Operational map of Rommel’s first offensive in North Africa during Operation Sunflower. Beginning at El Agheila on 24th March 1941, German and Italian forces advanced rapidly across Cyrenaica through Benghazi, Mechili, and Derna, driving British troops eastward and leading to the encirclement and siege of Tobruk.

Rommel's First Offensive

24th March 1941

Despite strict orders from the German and Italian High Commands to remain on the defensive until all elements of his force have arrived, Generalleutnant Erwin Rommel seizes the initiative and launches his first offensive in North Africa. At 06:00, Aufklärungs-Abteilung 3 of the 5th Light Division spearheads the assault against El Agheila, a key defensive position on the Gulf of Sirte.

The small British garrison executes a skilful fighting withdrawal from the fort and through the town, attempting to delay the Axis advance. By midday, El Agheila is under complete Axis control, having met only minimal resistance, although the British manage to mine the airstrip to hinder the immediate deployment of Luftwaffe units.

Rommel's forces then begin probing cautiously eastwards along the coast towards Mersa Brega, approximately 30 kilometres away, with reconnaissance elements supported by Panzer III and Panzer IV tanks from Panzer-Regiment 5.

30th March 1941

German reconnaissance units from Aufklärungs-Abteilung 3 of the 5th Light Division reach the outskirts of Mersa Brega, making contact with elements of the British 2nd Armoured Division, supported by armoured cars of the 3rd King's Own Hussars, attached from the Support Group of the 7th Armoured Division.

The British have hastily constructed a defensive line stretching inland from the coast, with fortified positions along key ridgelines and extending south to the difficult terrain of the salt marshes, securing their inland flank. Their objective is to funnel the German attack directly into their main defensive positions and block any further Axis advance eastwards.

Although the position appears strong on paper, many British armoured units are suffering from mechanical failures and shortages of serviceable tanks, weaknesses Rommel is eager to exploit.

31st March 1941

The terrain east of Mersa Brega consists of flat coastal plains offering few natural obstacles. Recognising the British potential to use the town as a chokepoint to block his advance, Rommel orders the 5th Light Division, supported by Italian units, to immediately assault the British positions at Mersa Brega.

By around 10:00, advance elements are within 3 kilometres of the airstrip southeast of the town but are stalled by fire from a line of 2-pounder anti-tank guns positioned behind two belts of mines. The Germans, having tuned into British wireless traffic, intercept messages revealing the critically thin British defensive line and its severe lack of artillery support. Sensing an opportunity, Rommel moves to exploit the situation.

By the afternoon, with German pioneers having cleared paths through the minefields, Rommel orders a full divisional assault against the British positions south of the town. By evening, the British defensive line is penetrated. Facing the risk of encirclement, British forces are compelled to retreat from Mersa Brega, falling back east towards Agedabia.

April 1941

The Advance Across Cyrenaica

3rd April 1941

Forward elements of the 5th Light Division, supported by units of the Italian Ariete Armoured Division, reach and occupy Agedabia, which falls with little resistance. The British covering forces of the 3rd Armoured Brigade, 2nd Armoured Division, have already withdrawn rather than risk encirclement.

The retreat reflects the deteriorating condition of British forces in Cyrenaica, particularly the 2nd Armoured Division, whose tank strength has been severely reduced by mechanical breakdowns and weeks of continuous operations. By this stage, the division is down to roughly 80 serviceable tanks, comprising 26 Mk VIB light tanks of the 3rd King's Own Hussars, 22-27 mostly A13 cruiser tanks of the 5th Royal Tank Regiment, and 30-40 captured Italian M13/40 tanks of the 6th Royal Tank Regiment.

General Archibald Wavell arrives at the front to assess the deteriorating situation. Alarmed by the collapse of the defence, he orders Lieutenant-General Sir Richard O'Connor to return from Egypt. Rather than outright replacing General Philip Neame, Wavell places O'Connor in an awkward dual-command role to advise and assist him.

Meanwhile, with British forces rapidly retreating eastwards, Rommel seizes the opportunity and orders a bold three-pronged advance: along the coast road towards Benghazi, north-east towards Mechili, and eastwards across the interior desert tracks towards Tobruk before turning north towards Tengeder.

4th April 1941

Advance elements of the 5th Light Division and attached Italian units enter Benghazi virtually unopposed, the British having abandoned the city. The Axis capture of Benghazi, with its intact port facilities, valuable supply stores and large number of vehicles, provides an important logistical gain that supports Rommel's continued eastward advance across Cyrenaica.

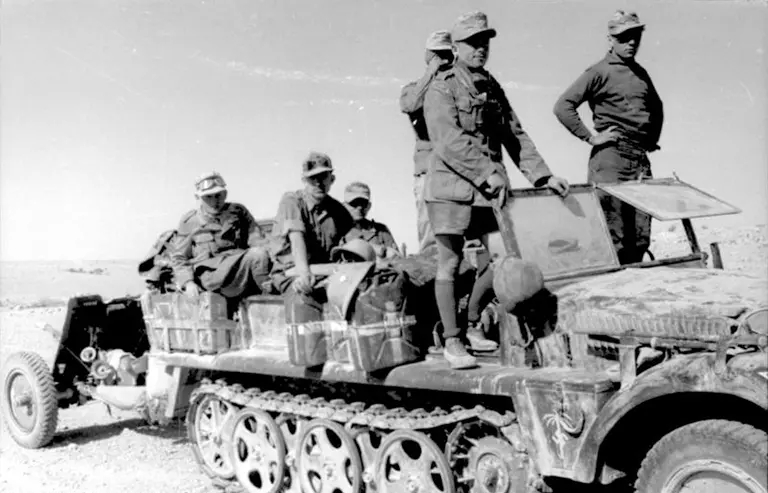
Afrika Korps Sd.Kfz. 10 half-track towing a 3.7 cm Pak 36 anti-tank gun across the North African desert during Operation Sunflower, 1941
Afrika Korps troops ride aboard a Sd.Kfz. 10 half-track towing a 3.7 cm Pak 36 anti-tank gun across the North African desert in 1941. The light, motorised combination reflects the mobility that defined early German operations during Operation Sunflower as Axis forces advanced across Cyrenaica.
6th April 1941

German forces capture Antelat and continue their drive inland towards Mechili, threatening to cut off British forces retreating from western Cyrenaica as they withdraw towards Tobruk. Reinforcements, including elements of the 9th Australian Division, the 18th Australian Infantry Brigade (detached from the 7th Australian Division), and additional armour, arrive at Tobruk by sea from Alexandria to strengthen the fortress.

Overnight, Lieutenant-General Philip Neame and Lieutenant-General Richard O'Connor become disoriented while travelling between headquarters. They inadvertently drive into an advancing German motorcycle reconnaissance unit (Aufklärungs-Abteilung 3) near Maraua, between Barce and Derna, and are captured. The loss of these two senior commanders in a single incident delivers a serious blow to British command and control during one of the most critical phases of the retreat.

7th April 1941

Elements of the 5th Light Division occupy Derna, securing its airfield for the Luftwaffe and forcing the 2/13th Battalion of the 9th Australian Division to withdraw along the coast road, narrowly avoiding encirclement.

Further south, converging columns of the German 5th Light Division and the Italian Ariete Armoured Division complete the encirclement of the vital crossroads at Mechili, trapping the British 2nd Armoured Division Headquarters, the 3rd Indian Motor Brigade, and supporting artillery units. With British command already shaken by the capture of Generals Neame and O'Connor, the encirclement at Mechili threatens the destruction of the last organised mobile force covering the retreat to Tobruk, leaving the withdrawal increasingly disorganised.

8th April 1941

Major-General Michael Gambier-Parry orders a desperate breakout from Mechili at dawn by the surrounded 2nd Armoured Division Headquarters and 3rd Indian Motor Brigade, which charge directly into the anti-tank screens of Vorausabteilung Schwerin and the advance elements of Panzer-Regiment 5. A small number of Indian and British troops successfully break through and reach Tobruk, but German armour and Italian infantry quickly seal the gaps, overrun the fort, and force the surrender of the 2nd Armoured Division Headquarters and the majority of the 3rd Indian Motor Brigade. Gambier-Parry is captured along with roughly 2,000 to 3,000 prisoners, effectively destroying the 2nd Armoured Division as a fighting formation.

While the Afrika Korps pushes beyond Mechili and Derna, overstretched supply lines and shortages of fuel and water begin to slow Rommel's rapid advance. Meanwhile, around Tobruk, the 9th Australian Division strengthens the fortress's defences, making extensive use of the Italian-built perimeter of strongpoints, anti-tank ditches, and barbed wire. As reinforcements continue to arrive by sea, the campaign enters a new phase, marking the transition from a fighting retreat to the determined defence of the fortress.

The Siege of Tobruk

9th April 1941

Major-General Leslie Morshead, commander of the 9th Australian Division, is appointed commander of the Tobruk garrison by Lieutenant-General John Lavarack, who had temporarily assumed command of Cyrenaica following the capture of Lieutenant-General Philip Neame. Acting on General Archibald Wavell's orders, the port is designated a fortress to be held at all costs. The decision is intended to deny Rommel the deep-water harbour needed to sustain any further Axis advance into Egypt.

10th April 1941

Major-General Leslie Morshead, commanding the Tobruk garrison, completes preparations for the defence of the fortress as Australian units, British artillery, and armoured reinforcements from the 1st Tank Brigade move into position. Rommel designates the Suez Canal as his ultimate objective and, convinced that Tobruk can be captured quickly before the defenders fully organise, thereby significantly shortening Axis supply and communication routes, orders immediate preparations for an assault. Initial probing attacks by reconnaissance elements of Aufklärungs-Abteilung 3, supported by armoured cars and tanks of Panzer-Regiment 5, test the south-western sector of the Tobruk perimeter held by the 20th Australian Brigade. Australian defenders, supported by British artillery, repel the attacks with little difficulty, inflicting minor losses and forcing the Germans to withdraw. The encounters reinforce the growing realisation that Tobruk will not fall without a major assault.

11th April 1941

German and Italian forces complete the landward encirclement of Tobruk, severing the road east toward Bardia and the Egyptian frontier. During the afternoon, Rommel launches a hasty armoured thrust against the fortress perimeter near Outposts R59 and R63, focusing on the El Adem road sector held by the 20th Australian Brigade. Approximately 23 operational tanks from Panzer-Regiment 5 push forward but are driven back by concentrated British 25-pounder artillery fire, with four tanks knocked out or disabled and several more temporarily damaged by near misses from artillery shell fragments. After three weeks of continuous advance across Cyrenaica, Axis troops and vehicles show growing signs of exhaustion, and Rommel's attempt to capture Tobruk quickly stalls against the fortress's prepared defences.

German Flag

Generalleutnant Erwin Rommel

Commander of the Deutsches Afrikakorps

Letter to his wife on 11th April 1941

‘The Australians fight with remarkable tenacity. They are very tough opponents and it is no easy task against them.’
12th April 1941

With British forces retreating towards the Egyptian frontier, Kampfgruppe von Herff occupies Bardia, securing its port facilities and further tightening the noose around the Tobruk garrison. With Bardia in Axis hands, Rommel now controls the coastal ports from Tripoli to the Egyptian frontier, except Tobruk, providing additional supply points for his drive east. However, Tobruk's continued resistance denies him the most important harbour on the coast, forcing the bulk of Axis supplies to be hauled over long desert routes from Tripoli.

Attempting to secure Tobruk by bluff rather than another costly assault, Rommel issues a written demand for the garrison's immediate surrender, sending a captured British driver back into the fortress with the ultimatum, claiming that the defenders are completely surrounded by overwhelming Axis forces. Major-General Leslie Morshead ignores the demand.

With negotiations having failed, major ground assaults against the Tobruk perimeter temporarily ease as Rommel's forces regroup. The day is instead marked by intense artillery duels, while German and Italian patrols continue scouting the anti-tank ditches in search of a weak point to exploit during a larger assault. During one such reconnaissance near the perimeter, Generalmajor Heinrich von Prittwitz und Gaffron, commander of the 15th Panzer Division, is killed when his staff car is hit by Australian fire.

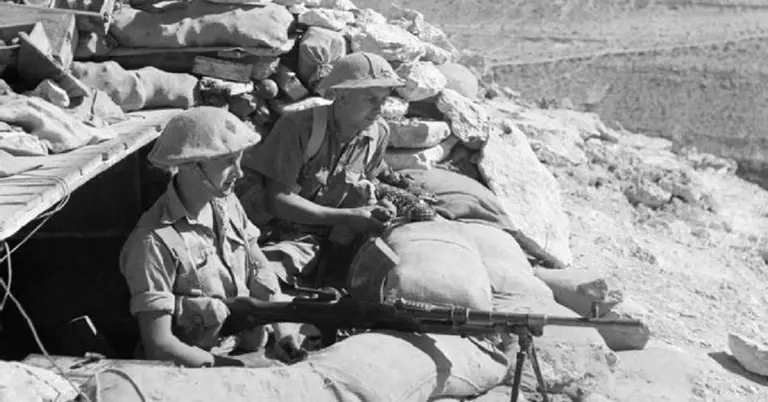
Australian 9th Division soldiers man a Bren light machine gun from a sandbagged defensive position at Tobruk during the Siege of Tobruk, 1941
Soldiers of the Australian 9th Division defend a sandbagged sangar at Tobruk in 1941. One operates a Bren light machine gun while his comrade scans the desert approaches. The steadfast defence of Tobruk during the siege frustrated Rommel’s Afrika Korps and became a defining episode of the North African campaign.
13th April 1941

After dark, Rommel launches the so-called "Easter Battle", a major assault against the Tobruk perimeter. Infantry of the 5th Light Division, supported by armour, attempt to breach the anti-tank ditch west of the El Adem road near Strongpoint R33, with German tanks establishing a foothold. In an attempt to eliminate the penetration, the 2/17th Battalion of the 9th Australian Division launches a series of close-quarter counter-attacks.

German advance units capture Sollum, a small but strategically important port near the Libyan-Egyptian frontier.

Rommel receives orders from Berlin to consolidate along the Egyptian frontier and prioritise the capture of Tobruk. Although he remains inclined to bypass the fortress and strike towards the Suez Canal, he decides to postpone any further major assaults until the 15th Panzer Division arrives.

The Luftwaffe flies around 150 sorties against Valletta, Grand Harbour, and the island's airfields, causing widespread destruction and civilian casualties. Several waves pound the dockyards and the capital, making this one of the heaviest single days of bombing endured by Malta during the spring offensive.

14th April 1941

Before dawn, Panzer-Regiment 5 attempts to drive through the breach near Strongpoint R33, but is ambushed by concealed Australian anti-tank guns and British 25-pounder artillery. By dawn, the German attack against Tobruk has been contained, forcing the attackers to withdraw with heavy losses, including 16 of their 38 tanks destroyed and some 350-400 men killed or wounded. Australian casualties amount to around 90-100 men.

Kampfgruppe von Herff advances to capture the commanding heights of Halfaya Pass, overlooking the main coastal road into Egypt. Holding this commanding position secures Rommel's eastern flank and enables the Axis to block British attempts to relieve Tobruk from the Egyptian frontier.

British Middle East Command reconstitutes the Western Desert Force, replacing the static Cyrenaica Command (CYRCOM) with a mobile field headquarters. Lieutenant-General Sir Noel Beresford-Peirse leaves his command of the 4th Indian Infantry Division in East Africa to assume operational command.

15th April 1941

Rommel consolidates his hold on the frontier positions, with German troops digging in at Sollum and the newly captured Halfaya Pass. Axis reconnaissance patrols probe eastward into Egypt, clashing lightly with the British 7th Support Group and armoured cars of the 11th Hussars, which are operating as a mobile screening force protecting the British railhead at Mersa Matruh. Inside Tobruk, the garrison uses the temporary respite from major ground assaults to repair the wire at Strongpoint R33 and strengthen the inner defensive lines.

16th April 1941

In the early hours, the 14th Royal Navy Destroyer Flotilla, led by Captain Philip Mack aboard HMS Jervis, intercepts and destroys an Axis supply convoy off the Kerkennah Islands during the Battle of the Tarigo Convoy. All five merchant vessels are sunk: the German ships Alicante, Marburg, Ankara, and Kybfels, together with the Italian transport Aegina. The convoy is carrying between 3,500 and 4,000 tons of ammunition, hundreds of tons of fuel and oil, more than 1,100 military vehicles, and around 3,000 reinforcements and technical personnel intended for the Afrika Korps.

Three escorting Italian destroyers, Luca Tarigo, Baleno, and Lampo, are also sunk. However, the British lose HMS Mohawk, which is struck by a final torpedo fired from the crippled Luca Tarigo before she sinks. Over the following days, the Regia Marina mounts a large-scale rescue operation, recovering around 1,200 survivors from the sea.

The destruction of the convoy significantly worsens Axis logistical difficulties at a critical stage of Rommel's offensive. The loss of fuel, ammunition, vehicles, and experienced personnel further strains his already overstretched supply system, forcing restrictions on artillery ammunition and limiting the mobility of frontline units around Tobruk. The disaster prompts the Axis to re-evaluate convoy routing and escort procedures throughout the Mediterranean.

Following the failure of the Easter Battle, Rommel shifts his focus to the western sector of the Tobruk perimeter, ordering a major assault against the high ground of Ras el Medauar. Preceded by heavy artillery duels and Luftwaffe bombing runs, tanks of the Italian 132nd Armoured Division Ariete and infantry of the 62nd Trento Division attempt to storm the defences in a severe rainstorm. The assault is decisively broken by the 2/48th Australian Battalion and concentrated British artillery fire, which destroys five Italian tanks and forces the Italians to withdraw. The action confirms to Morshead that the Axis is now searching for alternative weak points along the fortress's western flank.
17th April 1941

Rommel establishes his forward headquarters at Gambut, strategically located about 40 miles east of Tobruk, to coordinate both the ongoing siege operations against the fortress and the defensive screen along the Egyptian frontier.

Inside the fortress, the garrison demonstrates its offensive mindset as the 2/43rd Australian Battalion conducts a successful daylight raid against forward outposts of the Italian 27th Infantry Division Brescia on the eastern Bardia Road sector. Slipping across the anti-tank ditch, the Australians catch the Italian infantry by surprise, inflicting several casualties and taking 19 prisoners before withdrawing under the cover of their own mortar fire.

Meanwhile, the British Western Desert Force continues to organise its defensive lines along the frontier and build up its supply depots around Mersa Matruh.

18th April 1941

Infantry of the Italian 55th Infantry Division Savona, reinforced by German mobile detachments, continue fortifying their outposts around Fort Capuzzo and Bardia to block any immediate British counter-offensive from Egypt.

On the southern sector of the Tobruk perimeter, a stealthy patrol from the 2/15th Australian Battalion successfully ambushes a working party from German Panzer-Pionier-Bataillon 200 near the El Adem road. The Australians kill or wound several German engineers and capture the remainder, successfully disrupting Axis attempts to map out and bridge the defensive anti-tank ditch.

Overhead, Junkers Ju 87 Stuka dive-bombers of II./StG 2 "Immelmann" maintain relentless pressure, targeting Tobruk harbour and the British shipping supplying the fortress. To protect the Stukas from Royal Air Force interception, the Luftwaffe begins deploying fighter elements of I./JG 27 to the nearby Ain el Gazala airfield to provide dedicated escort cover.

19th April 1941

The pattern of aggressive defence intensifies inside Tobruk as elements of the British 1st Battalion, Northumberland Fusiliers, and the Tower Hamlets Rifles conduct a night patrol, clashing sharply with infantry from Maschinengewehr-Bataillon 8 on the El Adem Road sector. The British prevent the German machine gunners from establishing forward mortar positions and interlocking weapon nests near the outer wire. Although casualties on both sides remain relatively light, these continuous aggressive sorties fatigue frontline Axis troops and reinforce Morshead's doctrine of denying the enemy control of No Man's Land.

British Pathé Footage of the Attack on Tobruk Harbour

Contemporary British Pathé newsreel footage depicting Allied and Commonwealth troops manning anti-aircraft defences and trenches during heavy Luftwaffe air raids on Tobruk's vital harbour and port infrastructure in April 1941.

The Fight for the Egyptian Frontier

20th April 1941

Rommel issues strict directives for the 5th Light Division and the Italian 55th Infantry Division Savona to hold firm at Sollum and Halfaya Pass, securing the Egyptian frontier, while ordering relentless pressure to be maintained against the Tobruk perimeter. The Luftwaffe responds by launching one of its heaviest concentrated air assaults yet, committing around 60 to 80 aircraft in successive waves. Junkers Ju 87 Stuka dive-bombers of StG 1 and II./StG 2, escorted by Messerschmitt Bf 109 fighters of I./JG 27, hammer Tobruk's harbour in an attempt to cripple Allied supply lines by sea. The British auxiliary escort HMS Fiona is sunk, and the hospital ship HS Vita is severely damaged by near misses, forcing the evacuation of her patients. Despite the devastation on the docks and intense duels with the garrison's anti-aircraft gunners, HMS Chakla and SS Kirkland, operating as part of the "Tobruk Ferry Service", continue stubbornly unloading vital ammunition and rations after dark.

21st April 1941

Luftwaffe dive-bombers maintain their intense air campaign against the fortress, executing a series of punishing raids. A notable casualty occurs in Tobruk harbour when the British cargo ship SS Bankura (3,185 GRT) is severely damaged by bombs and eventually sinks in the shallow waters of the port.

Despite the constant threat of air attack, the garrison pushes ahead with tactical counter reconnaissance along the western perimeter, around 1,000 metres beyond the main wire. The patrols discover that a substantial Axis force has established a forward staging area, making use of the dead ground behind a small but strategically important feature known as "Carrier Hill" to shield itself from observation. Intelligence identifies the force as infantry of the Italian 27th Infantry Division Brescia, heavily reinforced by field artillery batteries and supported by armoured detachments of the German 5th Light Division. The position poses an immediate threat, allowing the Axis to overlook a large section of the Australian perimeter and concentrate troops for a surprise assault.

22nd April 1941

To neutralise the threat at Carrier Hill, "C" Company of the 2/48th Australian Battalion, 26th Australian Infantry Brigade, supported by a detachment of Bren gun carriers, infantry tanks, and anti-tank guns, launches a two-pronged dawn raid. Charging with bayonets, the Australians catch the I and II Battalions of the 19th Infantry Regiment, 27th Infantry Division Brescia, completely by surprise.

In less than an hour of fierce close-quarter combat, the position is overwhelmed. During the assault, Sergeant Leonard Batty's section of Bren gun carriers drives straight through the Italian lines, circling the gun positions at a range of less than 50 yards. They pour intense machine-gun fire directly into the Italian gun crews before they can lay, sight, or fire their 75 mm guns, completely neutralising the battery.

The raid is a decisive tactical success for the Australians, who destroy four Cannone da 75/27 field guns of IV Gruppo, 55th Artillery Regiment, and capture 847 Italian prisoners from the Brescia Division, who without the promised armour from the 5th Light Division on its flank were left exposed behind Carrier Hill.

The massive haul of prisoners severely embarrasses Axis commanders and provides a significant morale boost to the Australian defenders, who suffer only two killed and between seven and ten wounded. The capture of Carrier Hill removes one of the principal Axis observation posts overlooking the western perimeter and delays preparations for another major assault on Tobruk.

23rd April 1941

Incensed by the previous day's disaster at Carrier Hill, Rommel issues a blistering reprimand to his Italian divisional commanders, explicitly citing a lack of aggressive vigilance and poor defensive coordination. Recognising that his besieging infantry is being ground down by the Tobruk defenders' unrelenting raiding tactics, he orders the Axis siege lines to be pulled back slightly onto more secure, defensible terrain to prevent further isolated detachments from being cut off.

Overhead, the Luftwaffe maintains a steady tempo of harassing air attacks, with its bombers escorted by Messerschmitt Bf 109 fighters of I./JG 27. Defending the skies, Hawker Hurricanes of No. 73 Squadron RAF scramble into a series of fierce, swirling dogfights over the perimeter. In one notable afternoon engagement, Free French pilot Sous-Lieutenant James Denis shoots down the aircraft of the rising German ace Hans-Joachim Marseille, forcing him to crash-land his heavily damaged fighter just behind Axis lines. Meanwhile, the garrison uses the brief lull on the ground to further strengthen the concrete fire positions of the Red Line and expand the network of dummy trenches designed to draw Axis artillery fire.

The First Aerial Duel Between Hans-Joachim Marseille and James Denis

Newsreel depicting the first aerial engagement between Luftwaffe fighter ace Hans-Joachim Marseille and Free French pilot James Denis over Tobruk in April 1941. Both pilots damage each other's aircraft, forcing Denis to crash and Marseille to make an emergency landing behind Axis lines.
24th April 1941

The Royal Navy's Inshore Squadron braves the hazardous daylight approaches to Tobruk. Slipping past the Luftwaffe's outer air patrols, Allied supply ships and naval auxiliaries successfully dock under the protection of the harbour's heavily concentrated anti-aircraft defences. The day is marked by repeated attacks from above as successive waves of Junkers Ju 87 Stuka dive-bombers scream down on the shipping channels, striking and sinking the British naval auxiliary HMS Kris. Despite the chaos and blazing fires along the waterfront, the garrison's lifeline holds firm as specialised flat-bottomed "A Lighters", including LCT 5 and LCT 10, push through the smoke to beach themselves and unload their cargoes. Protected by intense counter-barrages from the British 4th Anti-Aircraft Brigade, whose mix of heavy 3.7-inch and lighter anti-aircraft guns brings down two Junkers Ju 87 Stukas, dockworkers and troops labour throughout the day and into the night to unload tons of critical artillery ammunition, medical stores, and fresh rations. The successful replenishment ensures the garrison remains fully supplied to sustain its high rate of defensive mortar and artillery fire, dealing a significant blow to the Axis strategy of starving the fortress into submission.

25th April 1941

The Tobruk garrison observes the first Anzac Day under siege. To prevent drawing catastrophic Axis artillery fire onto concentrated troops, Major-General Leslie Morshead bans formal parades, prompting a quiet dawn reflection by the troops.

The last remaining operational Hawker Hurricanes of No. 73 Squadron RAF are ordered to evacuate the fortress and fly out to Egypt, as the forward airfield inside the perimeter has become completely untenable under relentless shelling, leaving the air defence to the gunners of the British 4th Anti-Aircraft Brigade.

Roughly 80 miles to the east, along the Libyan-Egyptian border, a fluid and aggressive campaign unfolds as British Mobile Force columns, drawn from the 7th Armoured Division’s Support Group (including the 11th Hussars, 3rd Regiment Royal Horse Artillery, 1st King’s Royal Rifle Corps, and 2nd Rifle Brigade), launch a series of sharp, harassing raids around Fort Capuzzo and Sollum.

These columns aggressively probe and engage Axis outposts manned by Kampfgruppe von Herff and Italian troops from the forward elements of the 102nd Motorised Division Trento and 132nd Armoured Division Ariete. Recognising the strategic importance of securing his rear before launching another major assault on Tobruk, Rommel diverts vital reinforcements, including Aufklärungs-Abteilung 33 from the newly arriving 15th Panzer Division, to help stabilise his frontier positions.

26th April 1941

A deceptive lull settles over the Tobruk perimeter, punctuated by intense artillery duels, with the defenders relying heavily on counter-battery fire to suppress Axis artillery positions attempting to range onto the harbour. Under the cover of darkness, the Australian 24th and 26th Infantry Brigades launch aggressive reconnaissance patrols into no-man's-land, mapping the new defensive positions of the Italian 27th Infantry Division Brescia following the pull ordered by Rommel.

Along the Egyptian frontier escarpment, skirmishing intensifies around Halfaya Pass as British mobile "Jock Columns", composed of armoured cars from the 11th Hussars, motorised infantry of the 2nd Rifle Brigade and 1st King's Royal Rifle Corps, and 25-pounder guns of the 3rd Regiment, Royal Horse Artillery, execute hit-and-run raids. In response, Kampfgruppe von Herff launches a coordinated localised counter-attack. Spearheaded by Aufklärungs-Abteilung 3 and medium tanks of Panzer-Regiment 5, and closely supported by the Italian 8th Bersaglieri Regiment and elements of the 102nd Motorised Division Trento, the Axis forces push the British back around the approaches to Sollum and the Capuzzo sector, forcing the lighter British columns to execute a rapid tactical withdrawal to avoid encirclement.

Confident that the frontier is secure, Rommel allows the heavy armour and assault troops of the 5th Light Division to continue building up for another offensive, using the deep wadis around Acroma and the assembly areas west of the Ras el Medauar (Point 209) sector.

27th April 1941

Axis forces escalate localised probing attacks against the western and south-western sectors of the Tobruk perimeter to test the integrity of the Allied line. Small-scale but fierce firefights erupt, primarily around the Ras el Medauar salient and the flat desert approaches near the El Adem road. Under the cover of darkness, German combat engineers of Pionier-Bataillon 200 creep forward armed with wire cutters and mine detectors, mapping Allied minefields and attempting to clear narrow lanes through the outer barbed wire defences. The defenders of the 2/24th and 2/48th Australian Infantry Battalions respond swiftly. Supported by the pre-registered defensive barrages of the British 51st Field Regiment, Royal Artillery, the Australians launch immediate counter-measures and lay fresh improvised booby traps along the wire to keep the infiltration teams at bay.

Along the frontier, Kampfgruppe von Herff consolidates its positions overlooking the desert approaches from Egypt after securing Fort Capuzzo and the bottlenecks at Sollum.

Major-General Friedrich Paulus, Deputy Chief of the German General Staff, arrives at Rommel's headquarters from Berlin. After assessing Rommel's overextended forward positions, Paulus delivers a sobering strategic assessment, warning that significant reinforcements are unlikely and urging Rommel to consolidate his defensive positions rather than attempt any immediate advance into Egypt.

United Kingdom Flag

Winston Churchill

Prime Minister of the United Kingdom

Radio Broadcast on the 27th April 1941

‘Tobruk - the fortress of Tobruk - which flanks any German advance on Egypt, we hold strongly. There we have repulsed many attacks, causing the enemy heavy losses and taking many prisoners.’
28th April 1941

The relative quiet on the ground is broken by a sharp escalation in Axis air activity as Junkers Ju 87 Stuka dive-bombers, heavily escorted by Messerschmitt Bf 109 fighters, launch relentless raids against Tobruk harbour and the gun positions of the British 4th Anti-Aircraft Brigade. Amid the chaos, the Australian destroyer HMAS Waterhen braves the falling bombs to embark and evacuate more than 400 wounded personnel and medical staff for transport back to Egypt.

Along the western perimeter, the Australian 2/24th and 2/48th Infantry Battalions continue exchanging sporadic sniper and machine-gun fire with entrenched forward Axis elements, primarily from the Italian 27th Infantry Division Brescia and the newly arrived motorised infantry of Schützen-Regiment 115, supported by combat engineers from Pionier-Bataillon 200 as they probe the wire.

Major-General Friedrich Paulus continues his inspection at Rommel's headquarters. Remaining highly critical of Rommel's overextended logistics and his unauthorised dash to the Egyptian frontier, Paulus argues that the Afrika Korps must first consolidate its position before undertaking any further offensive operations. Rommel fiercely defends his actions, insisting that capturing Tobruk is essential to securing the North African front. By the end of the discussions, Paulus reluctantly begins drafting a compromise that would permit a limited assault on the fortress while explicitly forbidding any deeper advance into Egypt.

29th April 1941

In a major logistical blow to the garrison's supply lines, the British armed boarding vessel HMS Chakla is caught in a fierce afternoon Stuka raid at around 15:30. Battered by severe near-misses before suffering a direct hit, the ship is fatally damaged and finally succumbs to flooding, sinking at 22:05 hours and coming to rest on the harbour floor.

A tense, claustrophobic atmosphere grips the western sector. Having secured Paulus's hesitant, conditional approval for a limited assault, Rommel issues his final operational orders for the attack, codenamed Unternehmen Tobruk. That evening, under the cover of localised dust storms and darkness, the 5th Light Division shifts its heavy armour, motorised infantry, and artillery into their final assault assembly positions within the deep wadis west of Ras el Medauar (Point 209), opposite the 2/24th Australian Infantry Battalion of the 26th Australian Infantry Brigade.

Detecting the unmistakable rumble of tanks and heavy transport vehicles during the night, Major-General Leslie Morshead places the entire garrison on full alert. Australian infantrymen reinforce their sangars (stone breastworks), prime their grenades, and ensure their anti-tank guns are laid on pre-registered kill zones, bracing for the inevitable assault.

30th April 1941

Following a day of escalating shelling that culminates in a devastating late-afternoon artillery bombardment and intensive Stuka dive-bombing runs that obscure the horizon in choking dust, Rommel launches Unternehmen Tobruk at 19:00 hours. The assault, which becomes known as the Battle of the Salient, slams directly into the western bulge of the perimeter, held by the 2/24th Australian Infantry Battalion.

Spearheaded by the combat engineers of Pionier-Bataillon 200 blowing gaps through the wire, armour of Panzer-Regiment 8 and infantry of Schützen-Regiment 115, attached to the 5th Light Division from the newly arrived 15th Panzer Division, surge forward into the twilight, supported by infantry from the Italian 27th Infantry Division Brescia and tanks of the 132nd Armoured Division Ariete. Despite desperate, ferocious resistance from the Australian outer posts, the sheer weight of the Axis armour and coordinated flame-thrower teams allows them to breach the outer defence line and capture the vital high ground of Ras el Medauar (Point 209) before midnight. A brutal, chaotic night battle rages in the darkness as the 2/24th Australian Infantry Battalion, supported by the Royal Horse Artillery and British anti-tank guns, fights to contain the breakthrough.